An In-Depth Look at the Good, the Bad and the Ugly of Using mimoLive to Livestream Events
mimoLive is an amazing tool when in the realm of livestreaming and I’ve found it makes streaming high school sports including, but not limited to, baseball, football, water polo and volleyball a reality. It is powerful by being able to do many things at once and doesn’t take extensive training to dive into. Let’s begin with what it does best.
The good:
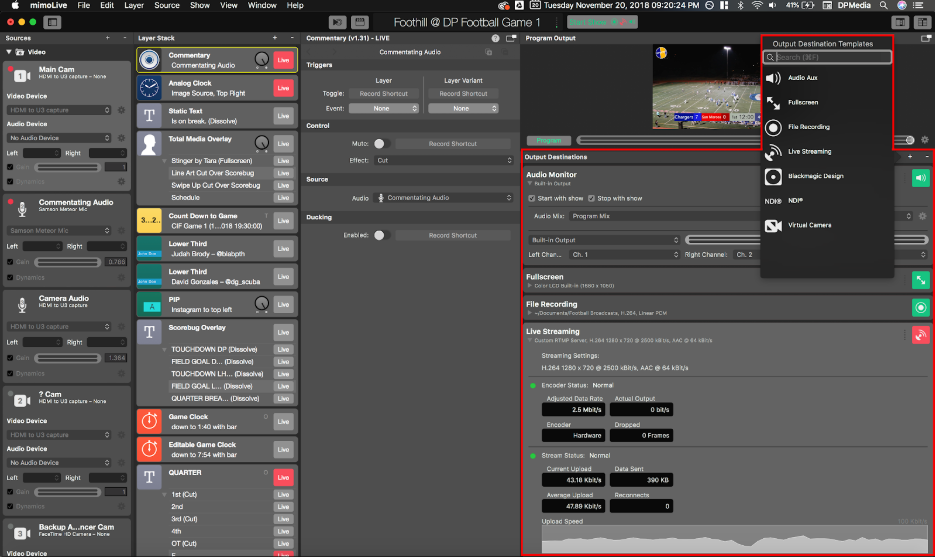
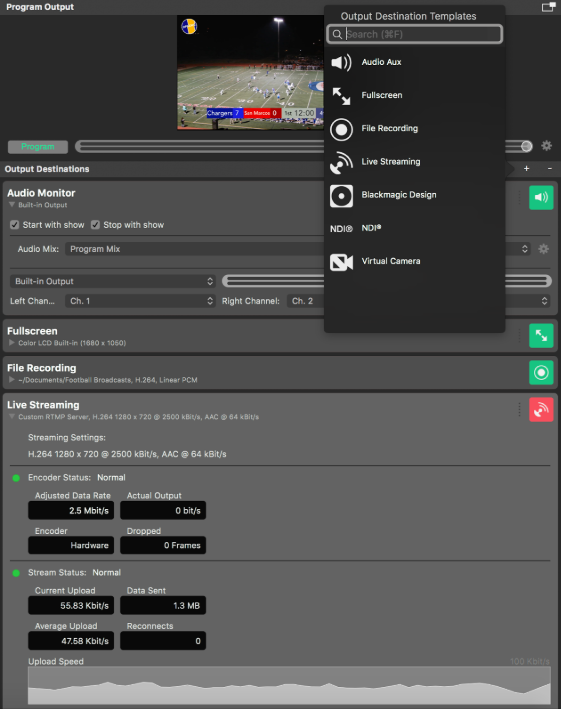
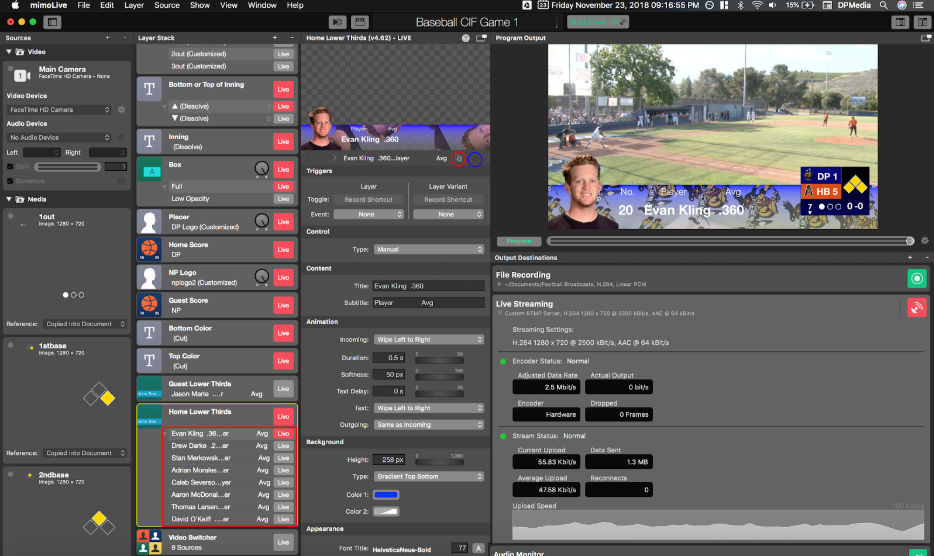
mimoLive connects easily to streaming service accounts such as YouTube or Facebook, but also allows to streaming out to a custom RTMP server. With the Output Destinations panel multiple outputs can be set, for example to stream to a platform such as YouTube, while recording an .mov file (H.264 is not the only format, i.e. Apple ProRes is an option) to a computer or hard drive, while streaming the show out for some other device to pick up by way of the NDI Network or Blackmagic Design devices. We’ve used the NDI network to send live interviews from anywhere on our campus directly to our Livestream 510 video switcher.
Side Note: In my experience, to stream out to NDI an ethernet connection is required, WiFi does not work.
Output Destination templates also include Audio Aux, synonymous to the Audio Monitor which allows stream audio to be heard through a device, Virtual Camera capabilities, and a fullscreen video mode.
mimoLive can pick up many different types of sources including HDMI, media files such as video or pictures, NDI feeds, or an iOS device’s screen/camera through a Lightning cable (mimoCam app required, $4.99 on the iOS App Store). Be wary of the size of images and video, extremely large media may not always work as expected. Another useful feature included with the license is mimoCall, which allows video feed wirelessly from a computer or iOS device (using the mimoLive Reporter app free on the iOS app store which has other cool features within itself) to be a source, using a unique call-id generated in mimoLive.
Bonus: Put a lens on an iOS device for a simple close-up camera, but don’t forget to secure a mount on a tripod for stabilization.
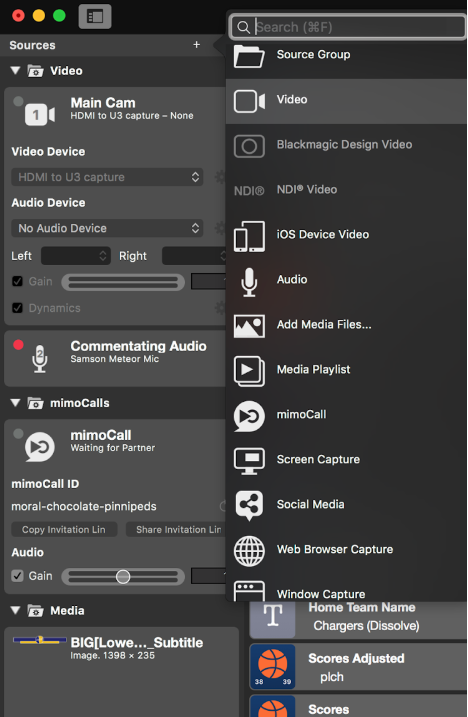
mimoLive comes with many extremely useful layers which can be used to create lower thirds, key out green screens, keep scores, show multiple sources for interviews, buffer and play instant replay, easily put media picture in picture, show tweets or Instagram posts, and so much more. For most layers it’s as easy as a dropdown menu to put a source into it, the most basic layer for this would be a placer layer. I recommend using the Video Switcher layer to easily switch between sources. I started using mimoLive by fooling around with a free trial and saw the many layers it offers, I suggest doing the same to see what it can do to suit your needs. There are also libraries of additional downloadable content available online.
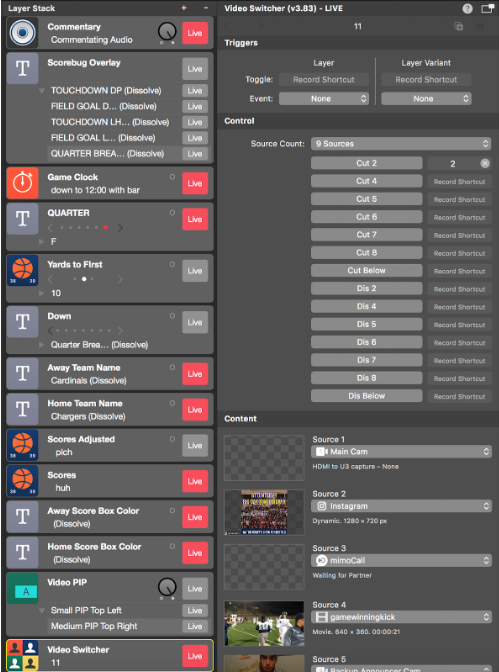
You can program keys, even variations of keys (i.e. shift+F), to be shortcuts, so that one person can manage everything from one laptop. If a great play is happening, there’s no need to miss it because you spent so much time scrolling up and down an intricate Layer Stack panel to switch a camera.
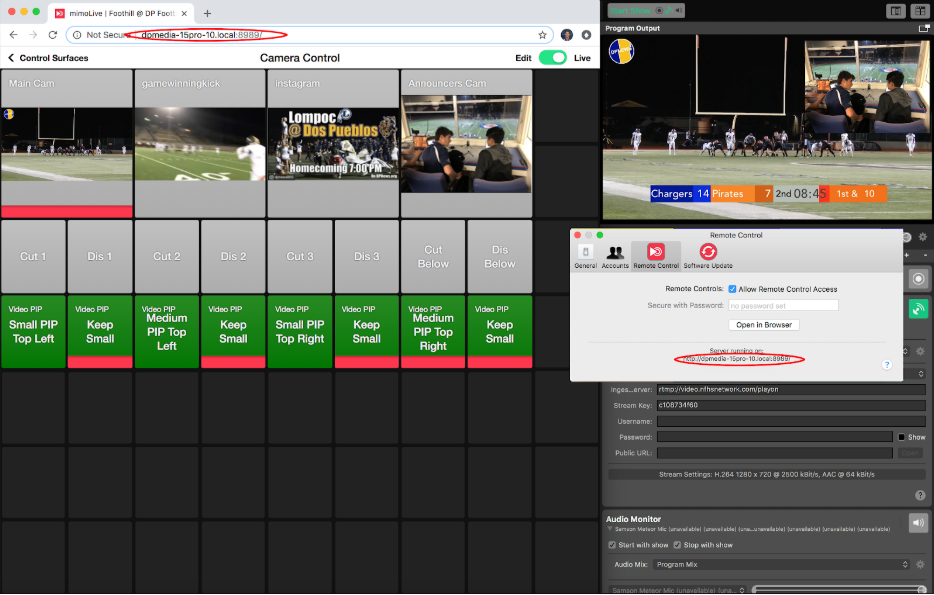
If all the technical aspects of running a broadcast prove to be too much for one person, mimoLive Remotes help delegate jobs to different people. They achieve the opposite goal of shortcuts, letting you program individual buttons on a remote to do things like switch cameras, change scores, and more. These remotes can then be accessed to use or edit from a device by using the url under “Server running on:” in mimoLive(top left corner)>Preferences>Remote Control or the mimoLive Remote app (free on the iOS App Store). As long as the device is on the same network as the main computer it will communicate instantaneously with mimoLive. I personally have created remotes to switch cameras and control scorebugs, but there are practically unlimited possibilities for what they can do.
mimoLive can stream different events from multiple devices simultaneously and can also stream the same event to multiple destinations with its most basic license. Updates are frequent and free of charge and as mentioned earlier mimoLive is extremely user-friendly, but there’s no shortage of helpful tutorials and information online if you get stuck.
The bad:
The way mimoLive lets you show game information is limited. One layer called “basketball scorekeeper” lets you change score for a home and away team in increments of 1, 2, and 3, and puts the respective team names and logos next to them. A stopwatch layer running in reverse can serve as a game clock or a shot/play clock. If you’d like a cleaner, more Fox-Sports-esque bug, you’ll need to play around with these layers and probably a few static text layers, but the more time spent messing around, the faster you’ll learn the software and the more it will make sense.
The more complex your live event is, the more layers it’s gonna take, and this can get messy quick. There is no feature which allows you to group layers, although I’m keeping my eyes peeled for this functionality in an update, as developers are working on it. The few half solutions to the problem are: using one shortcut to toggle all the layers in one group on/off (I use this to hide the scorebug at halftimes), programming buttons on remotes to perform many tasks (i.e. making multiple layers live), or creating layer variants whenever possible. Layer variants are just what they sound like, slightly different versions of one layer; just know that one layer variant of a layer can be live at a time. You can also use shortcuts or remotes to switch which layer variant is live.
I’ve stuck with streaming out 720p video, finding it more reliable than 1080p which I’ve seen crash and have extreme lag and glitches much more often than 720p. If you insist on trying 1080p test it with a stable internet connection to see how it works.
Crashes are infrequent, but my team and I have experienced them, albeit less with the updates that roll out. Ones that come to mind are network connection issues, I remember experiencing crashes when using my school’s WiFi to run a remote accompanying our live-stream, also run off the school’s WiFi. Which leads us to the fact that…
The ugly:
Reliable network devices are a must for live-streaming in general, not just mimoLive. Give yourself ample time before your broadcast to check how your WiFi, ethernet or other network device runs with each of the components of mimoLive you plan to use. In my program we’ve encountered so many school network issues that we often use a hotspot to provide us with internet connection at events. A hotspot can be especially useful at away-games where it isn’t always possible to test components ahead of time.
mimoLive has on occasion not given me full access to YouTube within the application. I would attempt to log in through the Preferences panel and it would appear to go through, but not actually have my account be present. Fortunately, there’s a way around this where you input the stream URL and stream key from YouTube manually to the custom RTMP server section of the Output Monitor.
Troubleshooting is simply unavoidable when it comes to mimoLive and it will take unplugging, replugging, turning off and on, waiting, and all those other fun things to even get a video source going sometimes. Human error will inevitably occur, but take those instances as lessons and don’t beat yourself up over them.
Dealing with school’s blocks and connectivity issues:
I’ve found many of the ports NDI uses to be blocked by my school’s administration. The reason I mention this is because a simple and effective way to use NDI within mimoLive is the Newtek NDI Camera app ($19.99 on the iOS App Store and Google Play Store) which allows a mobile device to be a wireless source, similar to mimoCall but instead picked up through NDI. I’ve found the range on both mimoCall and NDI limited, but both are most likely a result of weak wireless connection.
For those intending to stream to YouTube: I’ve also found my school’s administration has inadvertently blocked the ability to start the preview player (a necessary function to start live-streaming) in YouTube’s live control room. Refreshing the page sometimes solves this problem, but if this issue is coupled with weak connectivity a hotspot may be your best bet.
Side Note: Make sure to pause the preview player within YouTube’s live control room after streaming begins. Unneeded video streaming is a black hole which will suck up your data in no time if using a hotspot. We learned this the hard way.
mimoLive simplifies live-streaming and comes with many powerful tools that can be used for a wide variety of content. It is portable, able to be run from a single laptop, and shouldn’t be a daunting software to learn. Its most basic license is intended for non-profit, non-commercial use and comes at $199/year. The price does go down if you purchase for longer, and pricier options are available with more features. Now it’s time for you to get a free trial and dive into the software to see what it can do for you.