

Take Your GIFs to the next level – What I learned making Cinemagraphs this year and how you can make them too
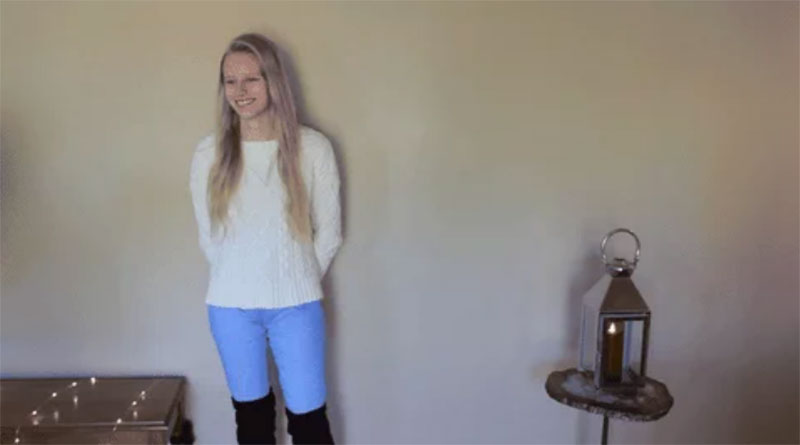
Over summer I went to a journalism camp at Ball State. On the last day of camp, after spending the week making a 20-page handbook, my camp advisor Ericka Quick and I were talking about what I wanted to do in the future and when I mentioned fashion media she got really excited and showed me some really awesome GIFs called cinemagraphs. After she showed me some examples I spent the rest of the camp looking up how to make one and having my roommate model for me so that I could try it out. I knew that I wanted to take this back to my publications back home so I tried it out on a couple of my fashion posts this semester. The result was amazing. (https://fhntoday.com/2017/12/
What is a Cinemagraph:
A Cinemagraph is a picture/gif where only one or two things in the picture are moving, this is what makes it a gif. I have used cinemagraphs as a part of some fashion posts that I have done. A good example is 2017 Fall Fashion Trends.
Before Photoshop:
Before you can jump into Photoshop and make a cinemagraph, you need to take some video. When you are filming make sure that are you are using a tripod so that the shot is completely stable, this will make the later steps a lot easier. When you are filming, make sure to keep in mind what you want to be moving in your finished cinemagraph. Try to keep everything that isn’t going to be moving in the finished one not moving as much, just to make things easier for you later on. The last thing to keep in mind when you are filming is that you should try to keep the video clips pretty short so that photoshop can run faster when you start to edit it.
In Photoshop:
After you get some video you want to drag it into Photoshop.
The program I used to make them was Photoshop CS6. The video I used to learn how to do this and am sharing below was using Photoshop CC. In CC they had some other settings that can be used, they are not needed to make a cinemagraph, but it can make the cinemagraph cleaner. The video on Youtube is called “How to make your pictures come to life using a cinemagraph.”
Depending on your computer, it might take some time for it to work through the format. After the video is in Photoshop, trim it down so that it is shorter. Hover over the end of the clip and an arrow will appear, drag that down to the size. When you are trimming it down make sure that the piece of the video that you want to be moving, is close to the same position that it was in when the video started so that when you make it loop it doesn’t seem jumpy. (CC makes this part easier and smoother)
After that, on your keyboard click command-shift-option-e, this will create a picture that you can overlay over your video that it is no longer moving. When doing this, make sure that the cursor is over a part of the video that looks the best. For example, if it is a model make sure in the photo that is overlaid your subject is smiling and looks nice.
If it doesn’t automatically put in the track over the video you will need to move it by right-clicking the triangle facing down on the right of where it says video group 1, then move it so that it is over the video. Once it is over it, create a mask on the photo, this makes it so the areas that were masked show the video under it. To brush out on the mask what you want to move hit B and drag it over the areas. To see what you are masking hit \.
Watch the whole clip to make sure that everything is masked that should be. Once you are happy with how it looks, it’s time to save it. On your keyboard click command-option-shift-s, this will pull open the save for web. When saving, make sure that the preset is a gif, the color and dither are the highest they can be and the looping option is set for forever.
That’s it. Note on some computers when you click on it to preview it, it just shows a bunch of pictures instead of a gif, to view the gif drag it into google drive, it will be a gif once it’s there.
That’s it. Happy creating and have some fun with it.

Hey, all – an app called “Plotagagraph” on the iPad does this too and REALLY well. Try it out!